When you submit a print order to one of our partner labs, you'll want to be certain that the crop you have approved during the Lab Approval Process is not cutting off a significant piece of the image. We do not shrink or resize any of your files before submitting them to the lab. Because cropping is inevitable when ordering certain print sizes, it helps to understand why and how each image will be affected when printing.
Aspect ratio is simply a measurement of a photo's width to height. Your DSLR camera most likely has a 3:2 ratio. (If you use an Olympus or Panasonic camera, you may have a 4:3 ratio.)
When your client wishes to purchase a print, any print size that is not on a 3:2 ratio must be cropped, meaning a piece of the photo will be cut off. Depending on the desired print size and how the image was shot, you may lose a lot (or just a little) of the picture. This could be significant if you shoot close and tend not to leave a lot of space around your subjects.
Technically, there is an unlimited number of aspect ratios. But there are a few common aspect ratios every photographer should know.
| Aspect Ratio | 3:2 | 7:5 | 5:4 | 6:5 |
|
Common print sizes in inches
|
4x6 | 2.5.x3.5 | 4x5 | 20x24 |
| 6x9 | 5x7 | 8x10 | ||
| 8x12 | 16x20 | |||
| 10x15 | ||||
| 12x18 | ||||
| 16x24 | ||||
| 20x30 | ||||
| 24x36 |
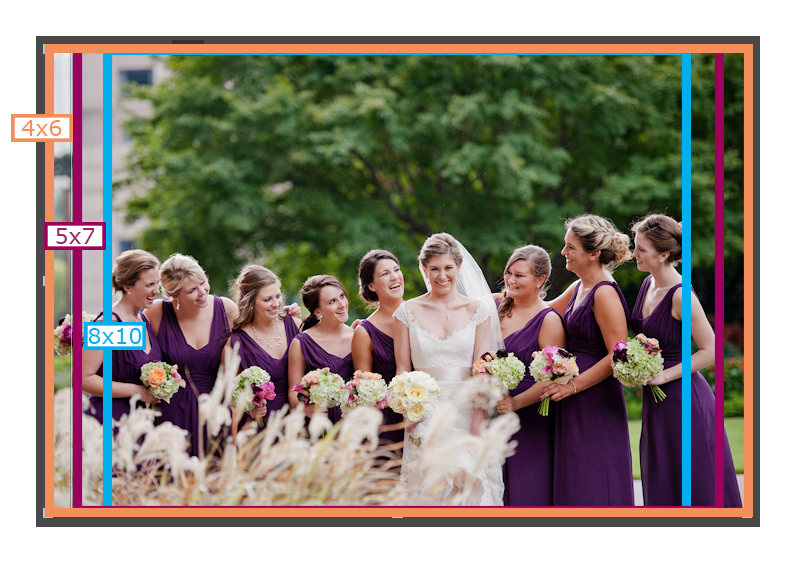
The example below shows how different print sizes would crop out important parts of the photo. You can see that printing an 8x10 of the photo (5:4 ratio) would cut off the subjects on both ends of the picture, whereas a 5x7 print would cut off the open space on both the left and right of the photo. You can also see that any print size that has the same aspect ratio as your camera (2x3) will keep the photo entirely intact. 
If you use Lightroom, you can use a tool on your images to get an idea of which print sizes will work successfully with an image and which will crop out important parts of the photo:
1. From the menu in the Develop module, select "Tools" and then "Crop Tool."
2. Select "Tools" again, then "Crop Guide Overlay" and then "Aspect Ratios."
3. Drag the cropping tool over your image to see the different possible crops.
In Photoshop, you can use the Crop tool and choose the appropriate aspect ratio from the menu on the top left. The crop box will then be appropriately sized, and you can get an idea of how your print may look if a client orders a print with that particular aspect ratio.
Regardless of what photo editing software you use or which professional (or non-professional) lab you have your photos printed at, ANY print size outside of the 2:3 aspect ratio WILL have to be cropped. This is why it is crucial that you check the crops on each image (by clicking on the individual images before beginning the Lab Approval Process) before submitting your orders to the lab. Ultimately, it is the photographer's responsibility to be sure the print size a client has ordered will work correctly for that particular image.